 So you’ve either just joined us from Part 1, where we learned how to emulate button presses on an RF outlet remote control, or you decided you’d rather skip that portion and go straight to the Network/Arduino link. Either way, I’m glad you’re here. In this tutorial, we will learn how to control the Arduino from a website residing on your own home server. As a disclaimer, I’m aware of several different methods of accomplishing the same thing with various Arduino shields, but I had a home server and no shields, so this is the method I chose. Let’s dive in…
This post will first teach you how to set up your own home server using Apache and PHP on Windows XP. The steps are likely very similar on Vista or 7, although there may be some OS changes that will invalidate or change some of what we are doing. If you are already serving up your own webpages from a home server, skip that portion and go on to the second part of this post, where we make a website and use a special program to direct socket requests from the webpage to the Arduino serial port.
Setting Up Your Own Server:
Before setting up Apache and PHP, we need to set up a DynDNS account. Most people don’t have a static IP address that allows them to access their home network externally. DynDNS tracks your dynamic IP address and assigns it to a static hostname, such as “username.dyndns.org”. There is a guide from DynDNS that shows how to sign up for their free dynamic service, and install and configure the Apache Service. We also want to install PHP, and Dev Shed provides some instruction on installing PHP as part of their own Apache tutorial. Check out the guide here. Go HERE to download the latest stable version of Apache and HERE to download PHP.
So, once you’ve followed the guides at DynDNS and Dev Shed, you should have Apache and PHP both running on your local machine, but accessible globally from your “username.dyndns.org” address. That’s the first (and most time consuming) part. Next we’ll see how to set up a site to control the Arduino we set up in Part 1.
Make a Webpage:
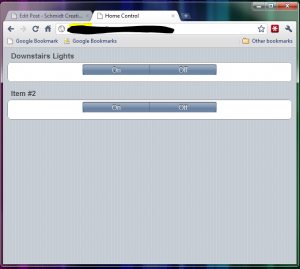
From the first part of the write-up, we saw that if the Arduino receives an ‘A’, it will turn ON the first outlet. Similarly, it if receives a ‘B’, it will turn OFF the first outlet. That’s all easy enough to accomplish through the Arduino Serial Monitor, but we want to do this from a webpage. First thing first, we want an interface that resides on our home server so all we have to do is click a button on the website to turn stuff on/off. This can be done from ANY web enabled device, and I routinely access my secure site from my Android phone to turn the lights on as I pull in the driveway. Here’s what my site looks like:
And here’s the code to generate that site (minus the CSS used to create the cool look, which can be accomplished by using iWebKit…it’s free!):
<head>
<title>Home Control</title>
</head>
<?php
if(!empty($_GET[‘do’]))
{
//open a connection to your computer running serproxy, on the port you found in serproxy.cfg
$fp = fsockopen(‘localhost’, 5333, $errno, $errstr) or die(‘Error(‘.$errno.’): ‘.$errstr);
if($_GET[‘do’] == 1)
{
//send character code 2. Can be replaced with whatever you want
fputs($fp, ‘A’);
}
elseif($_GET[‘do’] == 2)
{
fputs($fp, ‘B’);
}
elseif($_GET[‘do’] == 3)
{
fputs($fp, ‘C’);
}
elseif($_GET[‘do’] == 4)
{
fputs($fp, ‘D’);
}
//close the connection
fclose($fp);
}
?>
<body>
<span>Downstairs Lights</span>
<a href=”/ard2.php?do=1″>On</a><a href=”/ard2.php?do=2″>Off</a>
<span>Item #2</span>
<a href=”http://…./home/ard2.php?do=3″>On</a><a href=”http://…./home/ard2.php?do=4″>Off</a>
</body>
</html>
In the above code, skip down past the section until you get to the code. I know, it looks confusing, but in the end it’s not too bad. The portions we need to pay attention to are the fputs() statements. If the page reloads with do == 1, then the PHP code puts the character ‘A’ on the previously opened socket (which we will discuss below). You must change these values to whatever your Arduino is expecting. Towards the bottom of the code you’ll find the declarations of the buttons. Notice that the ON button is just a link to ard2.php?do=1, which reloads the page with do == 1, which would send an ‘A’ to the open socket to the Arduino, which turns the lights on. Simple, right?
Setup Serial Proxy:
Now we’re going to visit the portion of the code I told you to ignore earlier. We need a way to direct traffic from our webpage to the serial port. That’s where the Serial Proxy comes in. We will be using SerProxy. Go to that page, download and install, and run it as a service if you can (or at least on startup so it will start with the machine). I placed the .exe and the .cfg file directly in my web directory. You can open the .cfg file and configure it however you want your serial ports to work. My Arduino is on COM3, which is why you’ll notice I use 5333 when I go to open the socket in the PHP code. You MUST change that number to correspond with the serial port your Arduino is on. If it’s on COM2, change it to 5332, or if it’s on COM4, change it to 5334. You can also define new ports in the .cfg file.
Test it Out:
That should be it! If you followed directions and haven’t run into any bugs, you should now be able to click the links on your website from anywhere and have the Arduino respond accordingly. Pretty cool, huh? My fiancée didn’t understand why I sat there turning the lights on and off from upstairs, but whatever, it’s cool. Where can you go from here? I’m working on a PHP scheduling script so I can click a Vacation button on my webpage and have the lights come on and off on a schedule. I’m also looking into other sensors I could add, such as temperature/humidity monitoring, etc. Now that you can access it all from the web, anything that you can control with an arduino can be controlled from anywhere in the world. Hope you enjoyed the write-up.


Pingback: Arduino Home Automation | Schmidt Creative Design Studio
Pingback: » Arduino Home Automation, Part 1
john west
MD Schmidt
Pingback: Arduino Home Automation, Part 1 | CastleSeven